How do I transfer an audio file from my computer to my phone?
With smartphones becoming increasingly powerful computers in our pockets, many users want to be able to transfer audio files such as music, podcasts, or audiobooks to their phones. There are several reasons why you might want to transfer audio files from your computer to your phone:
Portability – By transferring audio files to your phone, you can take your music, podcasts and other audio on the go. You don’t need an internet connection to listen once the files are on your phone.
Save space – Audio files, especially music libraries, can take up a lot of storage space on your computer. Transferring them to your phone saves space on your hard drive.
Listen anywhere – You can listen to your audio files using your phone’s speakers or headphones in places you couldn’t easily take your computer. At the gym, on a walk, commute to work, etc.
Convenience – Accessing and listening to audio files on your smartphone can be more convenient than on a computer, provided you have enough storage space on your phone.
Backup – Having your audio files like music on your phone serves as a backup in case something happens to the files on your computer.
Prepare the Audio File
The most common audio file formats for transferring music to a phone are MP3 and M4A. MP3 is compatible with both iOS and Android devices, while M4A works best for Apple devices running iOS. Both formats compress the audio data to reduce file size while maintaining sound quality. According to experts, MP3 audio files can achieve a good balance of quality and file size at a bitrate of 128 or 192 kbps, while M4A files work well in the range of 256-320 kbps [1].
If your audio file is in a different format like WAV, FLAC, or WMA, you’ll need to convert it to MP3 or M4A first. Many free audio converter tools are available online to handle this conversion for you [2]. When converting, aim for an MP3 bitrate around 128-192 kbps or M4A bitrate of 256-320 kbps for the best quality. If needed, you can also re-encode existing MP3 or M4A files at a lower bitrate to further reduce file size – just be aware this may impact audio quality.
The most important thing is that the final audio file is in a format fully supported by both your computer and phone. Once converted if needed, you’ll be ready to transfer the file across devices.
Connect Devices
To transfer an audio file from your computer to your phone, you first need to establish a connection between the two devices. There are a few main ways to connect your phone and computer:
USB Cable
Using a USB cable is the easiest way to create a direct connection. Simply plug one end of the cable into your computer’s USB port and plug the other end into your phone’s charging port (typically located at the bottom). Make sure you are using the USB cable that came with your phone for the best compatibility.
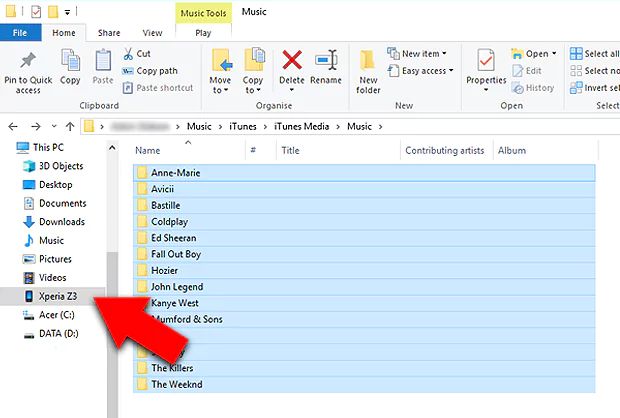
On a Windows 10 computer, your phone may automatically connect and appear as a drive in File Explorer. On a Mac, your phone will appear as a device in the Finder. For some Android phones, you may need to swipe down and select “File Transfer” after connecting to allow file access on your computer.
Wi-Fi Connection
You can also connect your phone and your computer over the same Wi-Fi network. Make sure both devices are connected to the same Wi-Fi router or hotspot. On your Android device, tap the “Files” app and select your computer name to browse files. On an iPhone, you can use AirDrop in the Files app to wirelessly transfer files to your Mac.
For extended wireless access on a Windows 10 computer, install the “Your Phone” app and link to your Android device. On a Mac, install the Android File Transfer utility to wirelessly manage files on your Android over Wi-Fi.
With either wired or wireless connections, you should now be able to access audio files on your computer directly from your phone’s file manager app.
Locate File on Computer
The first step is to navigate to the location of the audio file on your computer. Here are a few ways to find the file:
Open Finder and look in the Downloads folder – many downloaded files are saved here by default. You can find the Downloads folder in the Finder sidebar or dock. Double click to open it and browse for your file. Source
Use Spotlight search – Click the magnifying glass icon in the top right corner of your screen or press Command+Space to open Spotlight. Type in the name of the file and press Return. Double click the file result to open its location. Source
Browse in Finder – Open a Finder window and click through folders like Documents, Music, Pictures etc. to manually locate the file. Check recent places like Desktop, Downloads or external drives. Source
Once you’ve found the audio file, leave the window open to select and transfer it in the next step.
Transfer the File
Once you have located the audio file on your computer and connected your Android device, you are ready to transfer the file. There are a couple methods to transfer an audio file from a computer to an Android phone.
The most straightforward way is to use your computer’s file manager or file explorer. Navigate to the location of the audio file, right click on it, and select Copy. Then navigate to your Android phone’s folder in the file manager – it will usually appear as a removable drive. Right click in an empty space in the phone’s folder and select Paste to copy the audio file over. The file transfer should only take a few seconds for an audio file.
Alternatively, you can use the drag and drop method. Locate the audio file on your computer and left click to select it. Then drag it over to your Android phone’s folder in the file manager window and release to drop it in the destination folder. This will instantly transfer the file.[1]
Once the transfer is complete, you can safely disconnect your phone and the audio file will be accessible in the destination folder.
Locate File on Phone
Once the file transfer is complete, you can access the audio file directly on your phone. Here are the steps to locate the transferred audio file:
Open your phone’s file manager app, such as Files on an iPhone or My Files on an Android phone. Navigate to the folder where downloads are saved, such as the “Downloads” or “My Files” folder.[1] You may need to select the storage location of the transfer, like internal storage or SD card.
Use the search function in your file manager app to locate the audio file by name. This will help you quickly find the file if you have many other files saved.
Alternatively, open your audio player app, such as Music on an iPhone or Play Music on an Android. Navigate to the “Downloads” section, where recently transferred audio files are often saved by default. Locate the transferred audio file there.
Now you can tap on the audio file to begin playing it directly on your phone. The file is now easily accessible in your music player app for future listening.
[1] https://www.digitaltrends.com/mobile/how-to-find-downloads-iphone-android/
Play the Audio
Once the audio file has finished transferring to your phone, you can play it using your phone’s default music player app. To open the file, navigate to the location where you transferred it on your phone – this is often in the Music or Downloads folder.
Tap on the audio file to play it in your phone’s default music app, like Apple Music on iPhones or Google Play Music on many Android phones. The app should open and immediately begin playing the file.
If you want to use a different music app to play the file, you can open it from your phone’s Files app and select a non-default app to open it. Popular alternative music apps include Spotify, Pandora, and Apple Music on Android.
Once open in your music app of choice, you can play, pause, skip, shuffle, or queue up the transferred audio file just like any other song in your library.
Manage the File
After transferring the audio file to your Android device, there are various options for managing and working with the file:
You can create playlists of audio files using apps like Google Play Music or other audio players. Playlists allow you to organize multiple audio files and listen to them together.
To edit metadata like the title, artist, album, or other info, use an audio file tag editor app like MP3Tagger. Properly tagging your audio files helps with organization.
If you need to delete the audio file from your Android device, open the File Manager or My Files app, navigate to the audio file, tap and hold to select it, then choose the delete option. Alternatively, you can delete files within your audio player app.
For sharing an audio file, open it in your audio player, tap the share button, and select an app to share through like email, messaging, or a cloud storage service. This allows you to easily send the file to someone else.
Backing up your audio files off your device helps prevent losing them if your phone is damaged, lost, or wiped. You can manually back them up to a computer or cloud storage. Some Android backup services like Google Drive will also automatically back up your media files.
Troubleshooting Audio File Transfers
If you encounter issues transferring audio files between your computer and phone, there are some troubleshooting steps you can take:
Check that the audio file format is compatible between your devices. Common formats like MP3, WAV, FLAC, etc. generally transfer easily. More obscure formats may not be supported.
Make sure your USB cable is high-quality and can handle data transfer. Damaged or low-quality cables often cause connection issues during file transfers.
According to Microsoft Support, problems can occur if connecting your phone through a USB hub. Try connecting directly to your computer if possible.
Check that any required device drivers are installed and up-to-date on your computer. Outdated drivers can disrupt the ability to recognize devices.
Make sure your phone’s storage is not full or nearing capacity. Insufficient storage space can prevent files from transferring over successfully.
As a last resort, use a third party application like Wondershare Repairit to try repairing a corrupted audio file after a failed transfer attempt.
Summary
Transferring an audio file from your computer to your phone is a straightforward process that can be completed in just a few steps. To recap, you’ll need to prepare the audio file in a supported format like MP3, connect your devices via USB cable or Bluetooth, locate the file on your computer, transfer it over, and then locate the file on your phone to play it.
Some additional tips to ensure a smooth file transfer process include organizing your audio files in specific folders on your computer, testing Bluetooth connectivity before transferring large files, and confirming the file transferred properly before disconnecting your devices. You may also want to back up important audio files in multiple locations to prevent data loss. Following the steps outlined in this guide, you should now feel equipped to easily transfer audio files between your computer and phone.